
Composition and Decomposition of Polygons
Years ago, I had my bathroom redone. The man that came in to do the tiling was quiet, meticulous, patient and efficient. I live in an old house and was amazed at how he placed those tiles and got them to fit perfectly, even though the walls were not always the same shape. How did he do it? He didn’t just work by trial and error. He knew! He tiled those spaces knowing about areas and math! And he was composing new shapes and polygons using just squares and rectangles. He was finding the area through Composition and Decomposition of Polygons.
I like to keep legos, magna tiles, pattern blocks and tangrams available in my room. When there’s free time, my students can make patterns, play around and build. Even middle schoolers like to create patterns and build with blocks.
Pattern blocks are a great way to help students understand area and practice formulas as well as relate known areas to new and different ones. Students can learn how to decompose an unknown area or build up or compose from shapes they know.
I like to make stations so that my students can move around and try out different ways to make polygons. When I have tiled floors or different shaped desks, even better! Because then students start to think about areas in terms of the shapes they know best.
Set Up for the Composition and Decomposition of Polygons Activity
Have the following materials to set up stations:
- Pattern blocks
- Rulers or measuring tapes
- Masking tape
- Index cards – 4×6
- Post it notes – 3×3
- Magna tiles (if available)
- 1 inch graph paper (poster size is even better)
- Computers, chrome books or tablets (for possible online station)
- Worksheets for each student: The worksheet packet has a page for each station
Composition and Decomposition of Polygons Stations Activity Materials
Set up stations around the room. Depending on supplies and numbers of students, stations can be duplicated. Plan on having 2-3 students at each station at a time, but the work can be independent and fluid, so students can move to a new station when they finish the task.
Station 1 materials for Pattern Blocks: How many ways can you make a hexagon?
Pattern Blocks
Paper template – found on the worksheet p.1
Colored pencils or crayons
Also available Virtual Pattern Blocks
Station 2 materials for Post it notes: Make a Letter with Post its.
Post it notes (standard size, squares)
Blank paper
Station 3 materials for Decompose and Find the Area.
Rulers and scissors
Composite Shape examples, as found on the worksheet p. 4
Square inch graph paper
Station 4 materials for Make it with Triangles:
Index cards : 4×6
Scissors
See images of truss bridges on p. 5 of the worksheet
Station 5 materials for Tape it Out:
Use masking tape to outline a larger composite shape on the floor. If you have tiled flooring, be sure to use the squares to help reference and find the area.
Tape out 2 or 3 shapes if you have room
Provide yarn or String
Measuring tape or rulers
Launch the Lesson: Composition and Decomposition of Polygons
Students should already be familiar with how to find the area of squares, rectangles and triangles. By building up or breaking down composite figures into known polygons, students start to make the connection that the area is equal to the areas of what makes it up.
Post it notes are an accessible and easy way to show what a composite figure is. Or, if you have bathroom or kitchen tiles, they work well too!
Review how to find the area of a rectangle and show the students how to measure one tile or post it. Write the area on it.
Then, invite a student up to use 3 post it notes or tiles and put them together to make a shape. Some students make a rectangle, others make an L, and others may make a pyramid type stack. You could even invite other students up to make a different shape so that you have at least 2-3 examples of polygons made with 3 post its each.
Similar to this:
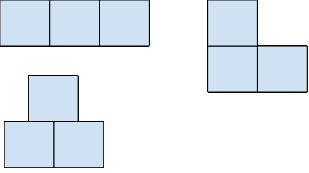
Then ask the students to find the area of each figure. They can see that even though they are different shapes, they are all made out of 3 post-it notes. If the area of a post it is 9in2 then the are of the shape each student made is 9in2 + 9in2+ 9in2 = 27in2
Hand other students each a single post-it note and tell them to add to one of the figures above. Different figures will be made.
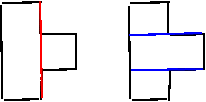
Then choose one of the figures, trace around it and take away the post-its.
For example, you might outline the following:

The students saw you take away the post it notes, and now they see the figure without the composite pieces. Ask what they think the area of this figure is.
After some discussion, ask the students how they knew. Explain that the shape was made or composed by adding known areas. However, if they are given a figure without lines or parts, like the outline, then they can draw their own lines and divide it into pieces themselves. This is called decomposition. A figure can be decomposed or broken into parts in order to find the area.
Ask the students if they know the area formula for every shape. Then ask if they remember the area formula for rectangles and triangles. If they can find the area of rectangles and triangles, then they can use those areas to help find the area of a more complex figure.
At this point, you can ask students if they could decompose the outlined figure into different rectangles, not just post-it note squares. See if they can come up with different ways:
Here are two other ways to decompose the post-it figure outline. Have students calculate the area of the rectangles and squares to see if the areas match.
Now take a post-it note and fold it diagonally in half to make a triangle. You can leave it folded or cut it into 2 equal triangles.
Place a triangle onto the composite figure above similar to this example:

Review how to find the area of a triangle. A = ½ (bxh) or for a post-it, A=½ (3 x 3) which is 4.5 in2. Show them how the area of the composite figure can also be decomposed into triangles. Reassure the students that they KNOW how to find the area of a triangle, so use this skill when they can!
Now that the students have an introduction to composite figures, introduce the stations. Some of the stations allow students to create and build (compose) and others help them think of ways to break it down (decompose). Each station has instructions and papers for recording or reflections. Tell the students that they are working independently and at their own pace. They can be at stations with 2-3 people, but each student can move on to a free station when ready.
The Stations
Station 1: Pattern Blocks: How many ways can you make a hexagon?
Provide pattern blocks, paper templates with outlines of single hexagon
Colored pencils or crayons
Also available Virtual Pattern Blocks
Instructions for students:
Use any combination of pattern blocks to create the yellow hexagon
Draw and color your examples to show the different ways
Find the area of the hexagon in square inches.
(The green triangle block is 0.5 sq.in)
Extend: Make a larger hexagon using only: trapezoids, parallelograms, or triangles. Trace and outline to show how you made it. What is the area?
Station 2: Post it notes: Make a Letter with Post its
Provide post it notes (standard size, squares)
Provide blank paper
Ruler
Instructions for students:
Find the AREA of 1 post it note, write it on the note (don’t forget correct units)
Make any letter from the alphabet using only post it notes (For example L, E, H)
It must fit on a piece of paper.
Calculate the AREA of the Letter that you made
Extend: Can you find the area of your initials?
Station 3: Decompose and Find the Area
Provide rulers and scissors
Composite shapes are located on p. 4 of the worksheet
Provide square inch graph paper
Instructions for students:
Using a ruler, divide the composite figure into parts: squares or rectangles
Find the area of each polygon
Add the areas together to find the area of the figure
Station 4 : Make it with Triangles
Index cards : 4×6
Scissors
Image of truss bridge found on p. 5 of the worksheet. (If you have a real-life picture of a truss bridge to project or share, this is helpful too so the students make a real-world connection)
Instructions for students:
Make 2 right triangles out of index cards by cutting each card in half
Use triangles to create a truss bridge pattern, similar to the image provided
Calculate the area of your bridge.
Station 5: Tape it Out
Use masking tape to outline a larger composite shape on the floor. If you have tiled flooring, be sure to use the squares to help reference and find the area.
Tape out 2 or 3 shapes if you have room.
Provide yarn or string, measuring tape, or rulers
Instructions for students:
Find the area of the figures on the floor
Use yarn to break it down or outline into rectangles/squares
Measure the sides of each part to help find the area
Reflecting on the activities
(Questions included on p. 7 of worksheet pack)
If you have the time, students should be able to rotate through all of the stations. If time is short, you can use the end of class for students to share and explain the stations they visited. This can be done in pairs or in front of the whole class.
Ask students which stations were “Composing” stations and which were “Decomposing”
Share different ways to break apart the different composite figures.
Ask if anyone used or could think of a way to use subtraction in order to find the area of a composite figure.
Here’s an example:

Ask – can we find the area of this large rectangle?
And if we do that, what do we have to take away to get the original figure?

Some students may already have tried this in the stations. Others may not have thought about using subtraction, but it is a great way to reflect on and extend the ideas of finding areas.
Extensions:
Find the area of composite figures using subtraction
Find a matted picture frame in school or at home. What is the area of the matt? The photo? Just the frame?
Play a few rounds of scrabble. Outline or sketch the figure the words make on the board, then find the area.
Make the Alphabet or your name in block letters and find the area. Compose with cards, post-its or pattern blocks, or make your name and decompose to find areas.
FREE Composition and Decomposition of Polygons Worksheets and Resources
These are all PDF Files. They will open and print easily. The Student Edition Files are labeled SE and the Teacher Editions Files are labeled TE. Click the links below to download the different resources.
- 6-4 Assignment TE – The Area of Polygons Through Composition and Decomposition (Members Only)
- 6-4 Assignment SE – The Area of Polygons Through Composition and Decomposition (PDF)
- 6-4 Bell Work TE – The Area of Polygons Through Composition and Decomposition (Members Only)
- 6-4 Bell Work SE – The Area of Polygons Through Composition and Decomposition (PDF)
- 6-4 Exit Quiz TE – The Area of Polygons Through Composition and Decomposition (Members Only)
- 6-4 Exit Quiz SE – The Area of Polygons Through Composition and Decomposition (PDF)
- 6-4 Guide Notes SE -The Area of Polygons Through Composition and Decomposition (PDF)
- 6-4 Guide Notes TE -The Area of Polygons Through Composition and Decomposition (Members Only)
- 6-4 Interactive Notebook – The Area of Polygons Through Composition and Decomposition (PDF)
- 6-4 Lesson Plan – The Area of Polygons Through Composition and Decomposition (PDF)
- 6-4 Online Activities – The Area of Polygons Through Composition and Decomposition (PDF)
- 6-4 Slide Show – The Area of Polygons Through Composition and Decomposition (PDF)
Area of Polygons Through Composition and Decomposition of Polygons Worksheets and Resources
To get the Editable versions of these files Join us inside the Math Teacher Coach Community! This is where we keep our full curriculum of 6th Grade Math Lessons and Activities.
- 6-4 Assignment – The Area of Polygons Through Composition and Decomposition (Doc – Members Only)
- 6-4 Bell Work – The Area of Polygons Through Composition and Decomposition (Doc – Members Only)
- 6-4 Exit Quiz – The Area of Polygons Through Composition and Decomposition (Doc – Members Only)
- 6-4 Guide Notes SE -The Area of Polygons Through Composition and Decomposition (Doc – Members Only)
- 6-4 Guide Notes TE -The Area of Polygons Through Composition and Decomposition (Doc – Members Only)
- 6-4 Interactive Notebook – The Area of Polygons Through Composition and Decomposition (Doc – Members Only)
- 6-4 Lesson Plan – The Area of Polygons Through Composition and Decomposition (Doc – Members Only)
- 6-4 Online Activities – The Area of Polygons Through Composition and Decomposition (Doc – Members Only)
- 6-4 Slide Show – The Area of Polygons Through Composition and Decomposition (PPT – Members Only)
Do You Want 6th Grade Math Activities Delivered To Your Inbox Everyday?
If you would like our 4th Grade Math, 5th Grade Math, 6th Grade Math, 7th Grade Math, and 8th Grade Math Resources Emailed to you Daily Click Here.

This Activity is From Unit 6 – Geometry
- 6-1 Area of Special Quadrilaterals
- 6-2 The Area of Right Triangles
- 6-3 The Area of All Triangles
- 6-4 The Area of Polygons Through Composition and Decomposition
- 6-5 Volume of Right Rectangular Prisms
- 6-6 Polygons on the Coordinate Plane
- 6-7 Perimeter and Area of Polygons on the Coordinate Plane
- 6-8 Nets and Surface Area