
How are Angles Used in the Real World?
Angles are everywhere! It’s great to have an angle hunt or to search for angles in the real world because students and teachers start to see angles that they may not have noticed before. When you look for angles in objects, you can find patterns and see how angles work together.
I love helping students find and identify angles in real life objects because they start to see how one angle might have another angle that goes with it. One time I had a drawing of a house and asked students to find one right angle. I was thinking that they would point out the right angle inside the house, but I had some students find the right angle of the outside, where the house meets the ground, or a right angle inside the door or window. Just this simple perspective of finding the same angle in different places helps reveal more views of angles and of the house. This helps students see how angles are made and even introduces concepts like supplementary and complementary angles.
As students discover angles in real life objects, they also learn about different types of angles and how angles help to make up shapes. I’ve had students search for and find types of angles in everyday objects and share what they found. If I can get my hands on a camera, then I have students take pictures of objects, print them out and outline and identify angles inside their photos.
Set up for the Find and Identify Angles Lesson
- Set up themed stations around the room with photographs of items from those places (photographs are provided on pages 2-11 of the Find and Identify Angles in the Real World worksheet, but you can add your own, especially if you have photographs of local spots that students would recognize): Aquarium, At the Park, Amusement Park, In the City, At the Beach.If possible, print the photographs in color for each station. You can also put the photographs into plastic sleeves. If you use page protectors, have thin tipped dry erase markers available.
- Provide each student with the Find and Identify Angles in the Real World worksheet (these can be printed in black and white).
- Provide students with colored pencils or thin tipped markers to record the angles onto the pictures on their worksheet.
- If you have a projector, set it up to show the image of a playground (shown below or a similar one) to project the image and then be able to draw images over the projection on the board, remove the image and see the angles on their own.
- Provide students with blank paper and rulers, and, if available, protractors. (Students do not need to use the protractors to measure the angles, but this is a good time to introduce the protractor and how it helps students identify acute, obtuse, and right angles.)
Launch the Activity: Angles in the Real World
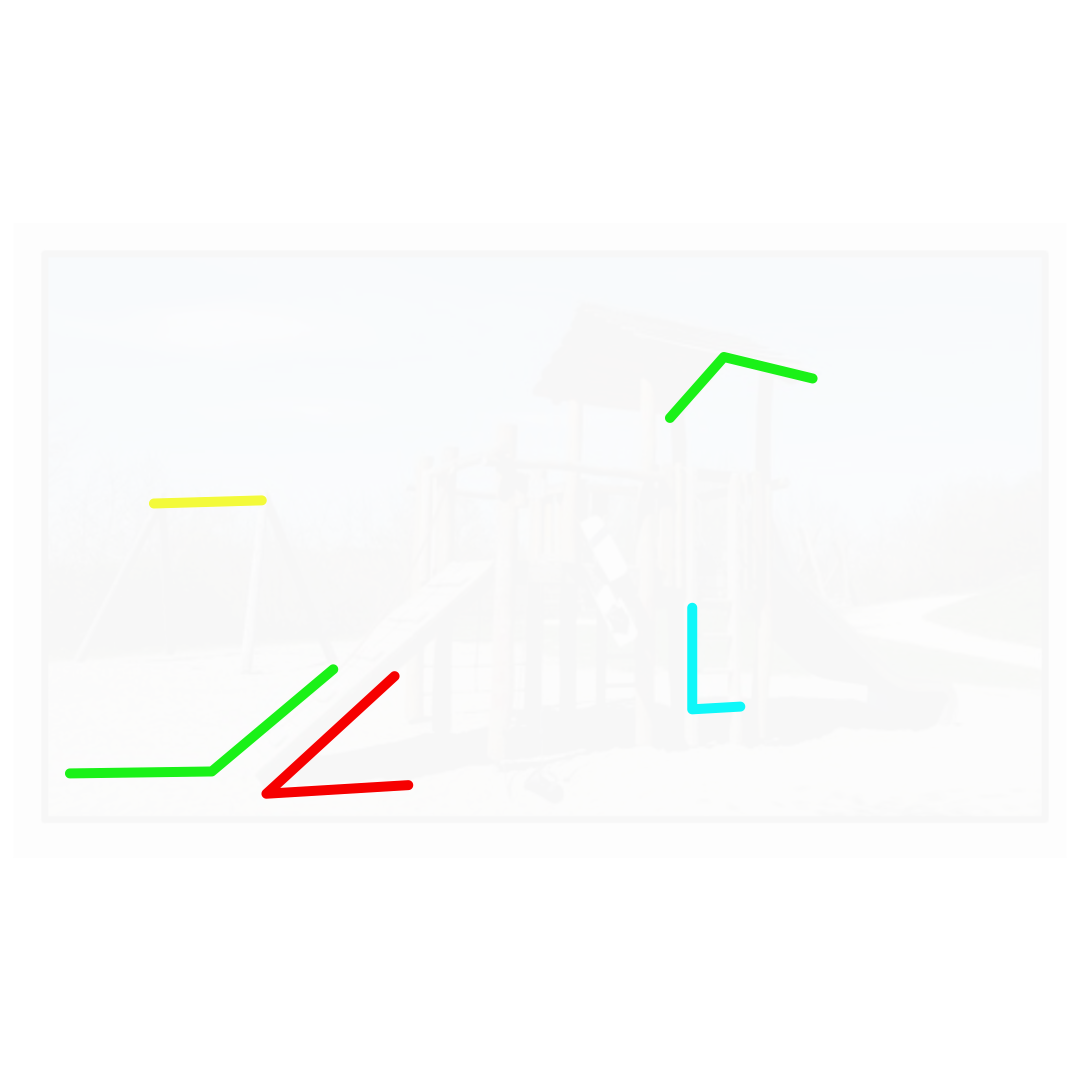
Project a photograph of a playground on a whiteboard or large piece of paper. The students have the same photograph on page 1 of their Find and Identify Angles worksheet and should follow along with as you trace angles onto the photograph, they can do so on their worksheet. If you want students to be able to practice before drawing onto the worksheets, you can provide plastic sleeves and students can use dry erase markers.
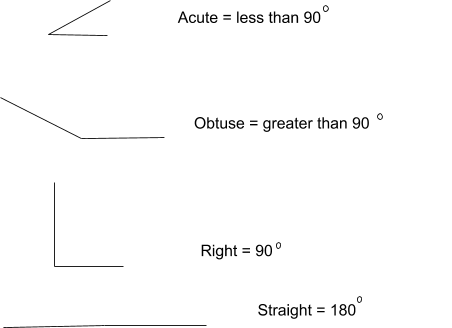
Here is an image that provides examples of each type of angle:
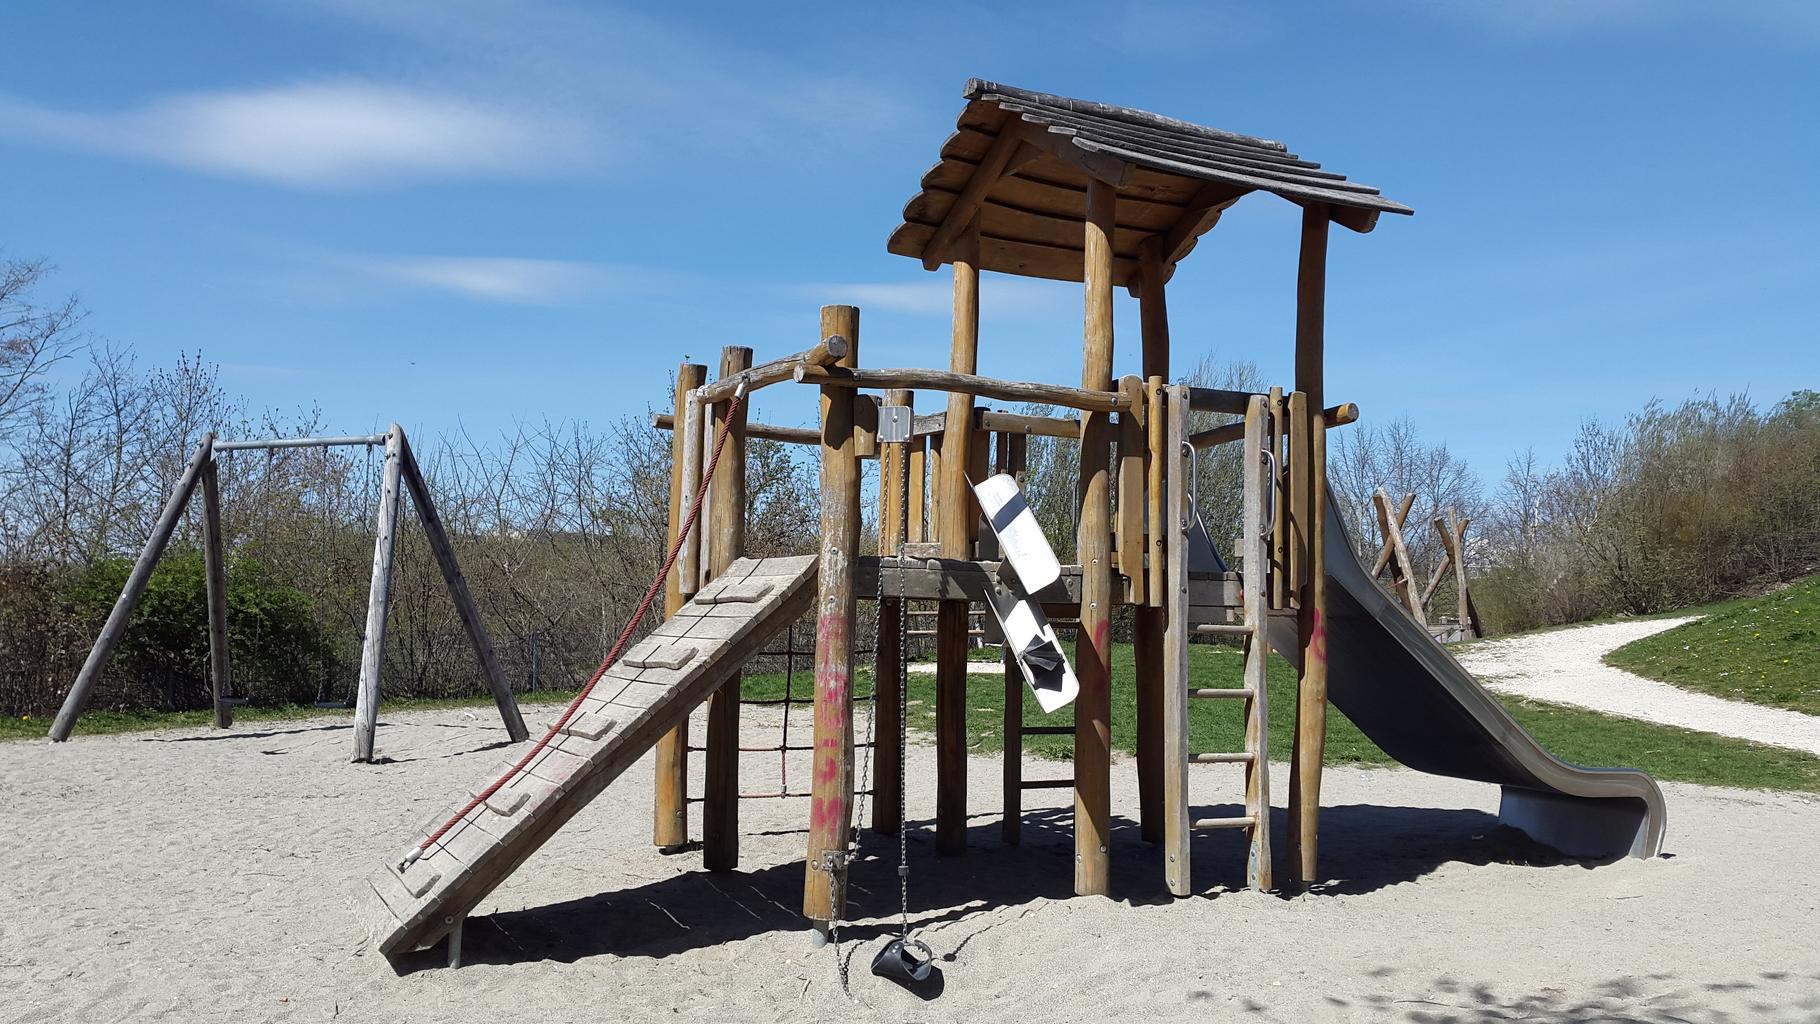
With the image projected, you can start to name and identify types of angles. Start by asking your students if they see angles. Then challenge students to see how many angles they can find. As students find angles, take a marker and highlight at least one angle of each type (acute, right, obtuse, and straight). Draw the marker lines over the angles in the image and identify each one, such as shown below.
Here is an example of an angle in this image:
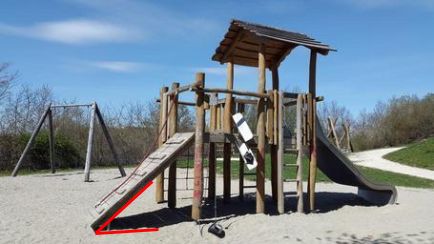
Ask students if they can identify or name this type of angle. It is an acute angle.
Then show an acute angle outside of the picture. You can do this by turning off the projector and showing the angle by itself. Like this:

Have the students sketch an angle similar to this on their worksheet and identify it as an acute angle.
Now help students to identify an obtuse angle, a right angle, and a straight angle in this image, reviewing the definition of each as you find it. You can identify and show these angles yourself, or ask for volunteers to come up and find an angle in the photo. Students can find these angles in their own image on the worksheet too.
Make sure every student fills out an example and definition for each type of angle:
Here is an example of the image with each type of angle.
You can color code if you use plastic sleeves, but students should sketch angles with pencil first on their worksheet and then color code.

After finding angles on the playground, and naming angles on the worksheet, divide the students into groups and have them visit each themed station. Students should use the color photographs at each station to find and identify angles. They should find the corresponding photograph on their worksheet, which will give them instructions for which types of angles to find. Then they will draw those angles (preferably in color) onto the image on their worksheet.
Each station should have multiple photographs so students have the option to work independently, even if they are grouped at a station.
Photographs for each station are located on pages 2-11 of the Find and Identify Angles worksheet, but you can also include more of your own, especially if you have photographs of local places that students would recognize and that correspond to the themes below. The instructions for the types of angles students should search for in each photograph are located beneath each photograph on the student worksheets.
Below are the station themes and lists of objects that would likely have angles to identify, in case you want to supplement with local pictures:
- Aquarium: starfish, shark fin, coral, plants, fish tail, fish head, crab claws, lobster, turtle, clam shell, scuba diver, flippers, submarine
- At the park: Slide, swings, seesaw, baseball diamond, soccer net, basketball court, jungle gym, trees, bikes, strollers
- Amusement Park: Swings, roller coaster, arcade, games, stroller, ice cream cones, snow cones, paths, train, gondola, pizza, slides
- In the city: Skyscrapers, angled buildings, sidewalks, subway, tracks, bikes, strollers, doors, windows, food carts, store windows, taxi cabs, crosswalks, cones, parking spots
- At the beach: Umbrellas, towels, buckets, shovels, sand castles, sand piles, boogie boards, sail boat, paddle board, kites, coolers, picnic baskets, bathing suits, shells, rocks
Set a timer for every 8-10 minutes, depending on the length of your class period, and have students rotate to a new station. Students do not need to do every photograph and do not need to work in the order the photographs appear on the worksheet, but they should keep working and tracing angles until the time is up at that station.
While students are working at the stations, circulate through the room and ask questions, encouraging students to find new angles they have not yet noticed.
Angles in the Real World Activity Reflection
Lead students in small or whole group discussions around reflective questions, such as the following:
- Did you find more acute or more obtuse angles?
- Are there more right angles than other kinds of angles?
- Did you find one type of angle and then see another one that goes alongside it?
- Did each station get easier or harder?
- Which station did you find the most challenging?
There are also reflection questions on the worksheet that students can complete on their own or in groups.
Angles in the Real World Extensions
- Students can go around school, at home, or in the community to take pictures with a tablet or camera and draw and sketch angles on the photos. Students could also add their own photographs (with angles sketched on) to the existing themed stations.
- Students can create a poster or slides presentation that shows images that have angles. Maybe one image highlights only acute angles, another shows only obtuse and another shows only right angles.
- Create a “Seek and Find” book or poster where there are “hidden” angles and include an answer key.
FREE Find and Identify Angles in Real Life Objects Worksheets and Resources
These are all PDF Files. They will open and print easily. The Student Edition Files are labeled SE and the Teacher Editions Files are labeled TE. Click the links below to download the different resources.
- 7-2 Assignment SE – Angles
- 7-2 Assignment TE – Angles (Member Only)
- 7-2 Bell Work SE – Angles
- 7-2 Bell Work TE – Angles (Member Only)
- 7-2 Exit Quiz SE – Angles
- 7-2 Exit Quiz TE – Angles (Member Only)
- 7-2 Guided Notes SE – Angles
- 7-2 Guided Notes TE – Angles (Member Only)
- 7-2 Interactive Notebook SE – Angles
- 7-2 Lesson Plan – Angles
- 7-2 Online Activities – Angles
- 7-2 Slide Show – Angles
Find and Identify Angles in Real Life Objects Worksheets and Resources
To get the Editable versions of these files Join us inside the Math Teacher Coach Community! This is where we keep our full curriculum of 4th Grade Math Lessons and Activities.
- 7-2 Assignment SE – Angles (Member Only)
- 7-2 Assignment TE – Angles (Member Only)
- 7-2 Bell Work SE – Angles (Member Only)
- 7-2 Bell Work TE – Angles (Member Only)
- 7-2 Exit Quiz SE – Angles (Member Only)
- 7-2 Exit Quiz TE – Angles (Member Only)
- 7-2 Guided Notes SE – Angles (Member Only)
- 7-2 Guided Notes TE – Angles (Member Only)
- 7-2 Interactive Notebook SE – Angles (Member Only)
- 7-2 Lesson Plan – Angles (Member Only)
- 7-2 Online Activities – Angles (Member Only)
- 7-2 Slide Show – Angles (Member Only)
Do You Want 4th Grade Math Activities Delivered To Your Inbox Everyday?
If you would like our 4th Grade Math, 5th Grade Math, 6th Grade Math, 7th Grade Math, and 8th Grade Math Resources Emailed to you Daily Click Here.

Don’t Forget to Pin this lesson on Find and Identify Angles in Real Life Objects…