

Classifying Two Dimensional Figure: Shapes in the World
This lesson is a chance for students to see that the world is made up of shapes. When they ask, “Why do I need to know geometry?” this is why. Our lessons in geometry and shapes often rely on 2D shapes in a textbook or drawn on the board, in isolation. It is not often that we actually look at the shapes around us and notice how they form our world. From the furniture we choose, to the books on our bookshelf, to the food we eat. Shape plays an important role in our lives both functionally and aesthetically.
While students are familiar with Classifying Two Dimensional Shapes, they probably don’t think about the attributes of most shapes unless asked to in school. You may want to wait to do this lesson until you have done an introduction to all of the shapes in your curriculum. This should not be the first time they have seen the names of these shapes. However, this lesson does begin with a review of most of the shapes they should have learned.
Classifying Two Dimensional Figures Project Introduction
This project will definitely take more than one day to complete. You will probably take one day to review shapes and explain the project. Then another day to have the students take photographs of shapes in the school and annotate them. You can have a third day for presentations, or have students hand them in and create a display that students can explore when there is time.
Set up for the Lesson
- Each student needs their math notebook or a piece of paper
- Timer
- One copy of Classifying Two Dimensional Figures 5th Grade Math Worksheet: Shapes in the World
- Shape reference materials, like a math textbook
- A camera for each student or pair of students
- Printer for student work or devices for students to create a multimedia presentation
Download: Classifying Classifying Two Dimensional Figures 5th Grade Math Worksheet: Shapes in the World
Launch the Lesson: Classifying Two Dimensional Figures 5th Grade
Set a timer for two minutes. It would be helpful to display the timer so students can see the time. Tell them the timer is set to two minutes so that they can make a list in their notebook of all the shapes they see in their immediate surroundings. They can look around the room and record the name of any shape they know. For example, the teacher’s desk is a rectangle. If they don’t know the name of a shape, they can draw it. Have them get themselves situated and yell “GO!” as you begin the countdown.
Once the time is up, have them share out the shapes they saw. As they identify shapes, ask how they knew they were looking at that shape. If a student says, “The clock is a circle,” encourage the student to elaborate by adding, “It is a circle because it has no sides.” They may not know enough to say that every point on the circle is equidistant from the center. That’s ok. They will get to that later. Let students share for about three minutes.
The Lesson: Classifying Two Dimensional Figures
Hand out the first two pages of the worksheet Shapes in the World. Explain to the students that they will be doing a super fun project. But they cannot start on it until they can identify the attributes of the shapes around them. This is a review of what they have already learned. You will do the first two in the chart with them, and then they will work in groups to complete the rest of the chart. Use your math book or other source to give the students a reference for the shapes. Another option here would be to distribute this chart to students to put in their notebooks before the lessons on introducing shapes and fill it out a little at a time so it’s complete by the time you arrive at this project. If you choose to do that and have covered all shapes on the chart, you can skip down to the project section below.
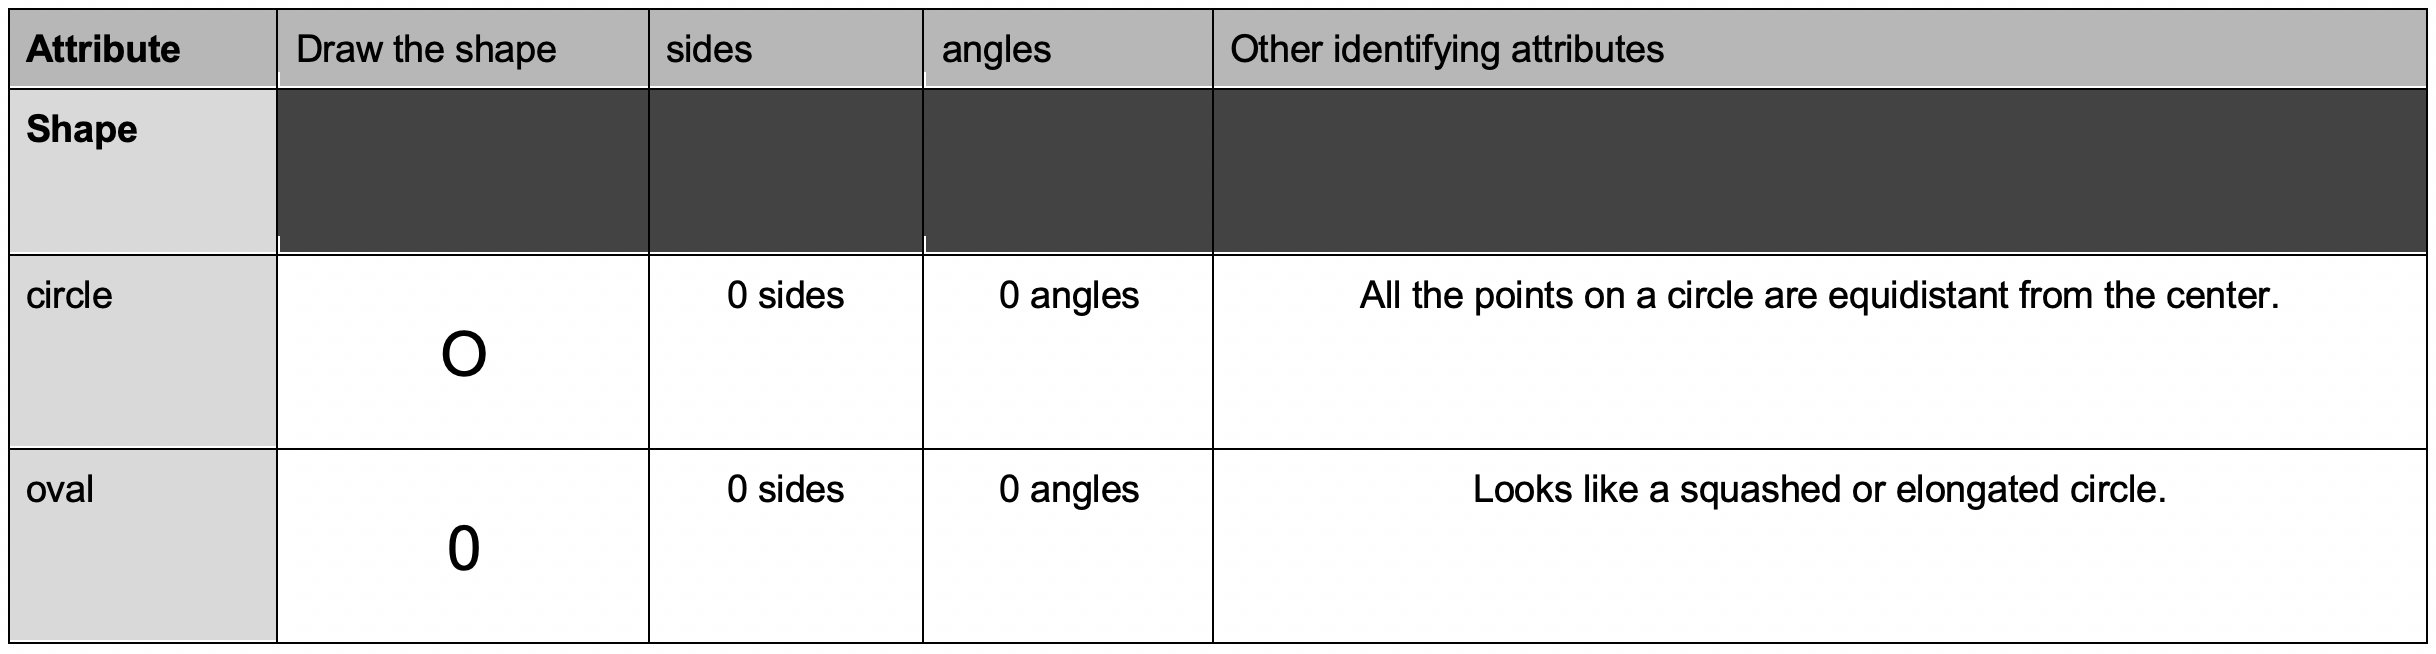
In order to complete the chart, split the students into groups of four. Each student should have their own Shapes in the World worksheet. This ensures that they all have the opportunity to do the work, but will help each other fill in the attributes. Assign each member of the group to complete 3-4 shapes on the chart. Then they will share their answers with each of the people in their group until the first two pages of the chart are completely filled in.
If students disagree on the attributes for the shape, have them look it up together and decide on the correct attribute together. This is a great time to teach about how students raise concerns to one another and the discourse needed to settle on a correct answer. Circulate as students are working and if you notice common misconceptions across groups, call the whole class together and discuss and review that shape and its attributes.
The Project: Classifying Two Dimensional Shapes in the Real World
Hand out the third page of the Shapes in the World worksheet. Tell the students that now that they know about shapes, they are going to go out into the world to identify them. They can use their iPad, phone or other teacher given instrument to take at least one picture of each of the shapes above. They can look for them in the shapes of the back of a chair, ceiling tiles, signs, floor and wall patterns, items students brought from home like backpacks, etc. Encourage students to be creative in their search! They should use their imagination and look for shapes in unexpected places. Each student should take his/her own photographs if there is sufficient technology. If not, they may work in partnerships or small groups.
Give students clear rules for where they may go. Let them know if they may leave the room. If so, what are the boundaries within the school building? I also tell my students that other teachers and staff at school know they are doing this project. If they are not following directions, I have asked other adults in the school to let me know. I also emphasize the importance of walking and talking quietly in the hallways. Depending on your own and school policies, you could also take the students on a “guided tour” of the school, allowing them to spread out and explore shapes independently in each space while still supervising the group.
When students return to the classroom, they will choose two of the shapes they photographed that they would like to compare. The two shapes should reside in the same categories so there are both points to compare and to contrast. For example, squares and trapezoids are both quadrilaterals so they both have four sides, but they have other distinguishing features that are distinct from one another. However, you could not find a commonality to compare a circle and a square, because they are not in the same category. Instruct students to choose two shapes that have at least one thing in common and at least one difference.
Students will print a copy of the two shapes’ photographs or move the photographs into a media presentation, like Google Slides or PicCollage. Their job is to compare two shapes. They should use the graphic organizer from the third page of the Shapes in the World worksheet to annotate the photos, labeling the attributes of each shape. Emphasize that they need to show which attributes each shape has in common and which attributes make them different from each other.
Reflecting on the Activity: Classifying Two Dimensional Shapes in the Real World
The best way to reflect on this activity is to have students share out what they learn about their shapes. They could do a presentation in front of the room or you could set up a gallery walk. Gallery walks are great because everyone gets a chance to share, but you can do it in a shorter amount of time. I usually give my students 5-7 minutes. Half of the class shares as the other half walks around. Then they switch, so the other students can share.
Some great questions to ask here are:
- Which attributes do the shapes share?
- Which attributes are different?
- How do the common attributes of shapes affect the way we use them?
- How do the different attributes of shapes affect the way we use them?
Extensions/Next Steps
Students love taking photographs. I work with the photography teacher to do a photography project with my students. There is math and science in every photograph. This would be a great extension or cross-curricular project or activity. The photography teacher comes in to talk about perspective, lines, and space. Kids get to see how geometry plays out in the photographs they take. And they learn to take a better picture. Who wouldn’t love that?!
Resources
https://digital-photography-school.com/shape-and-form-in-photography/
FREE Classifying Two Dimensional Figures Worksheets and Resources
These are all PDF Files. They will open and print easily. The Student Edition Files are labeled SE and the Teacher Editions Files are labeled TE. Click the links below to download the different resources.
- 7-5 Assignment SE – Classifying 2-Dimensional Shapes (PDF)
- 7-5 Assignment TE – Classifying 2-Dimensional Shapes(Members Only)
- 7-5 Bell Work SE – Classifying 2-Dimensional Shapes (PDF)
- 7-5 Bell Work TE – Classifying 2-Dimensional Shapes (Members Only)
- 7-5 Exit Quiz SE – Classifying 2-Dimensional Shapes (PDF)
- 7-5 Exit Quiz TE – Classifying 2-Dimensional Shapes (Members Only)
- 7-5 Guide Notes SE – Classifying 2-Dimensional Shapes (PDF)
- 7-5 Guide Notes TE – Classifying 2-Dimensional Shapes (Members Only)
- 7-5 Interactive Notebook – Classifying 2-Dimensional Shapes (Members Only)
- 7-5 Lesson Plan – Classifying 2-Dimensional Shapes (PDF)
- 7-5 Online Activities – Classifying 2-Dimensional Shapes (Members Only)
- 7-5 Slide Show – Classifying 2-Dimensional Shapes (PDF)
Classifying Two Dimensional Figures Worksheets and Resources
To get the Editable versions of these files Join us inside the Math Teacher Coach Community! This is where we keep our full curriculum of 5th Grade Math Lessons and Activities.
- 7-5 Slide Show – Classifying Two Dimensional Shapes (PPT – Members Only)
- 7-5 Online Activities – Classifying Two Dimensional Shapes (Doc – Members Only)
- 7-5 Lesson Plan – Classifying Two Dimensional Shapes (Doc – Members Only)
- 7-5 Interactive Notebook – Classifying Two Dimensional Shapes (Doc – Members Only)
- 7-5 Guided Notes TE – Classifying Two Dimensional Shapes (Doc – Members Only)
- 7-5 Guided Notes SE – Classifying Two Dimensional Shapes (Doc – Members Only)
- 7-5 Exit Quiz TE – Classifying Two Dimensional Shapes (Doc – Members Only)
- 7-5 Exit Quiz SE – Classifying Two Dimensional Shapes (Doc – Members Only)
- 7-5 Bell Work TE – Classifying Two Dimensional Shapes (Doc – Members Only)
- 7-5 Bell Work SE – Classifying Two Dimensional Shapes (Doc – Members Only)
- 7-5 Assignment TE – Classifying Two Dimensional Shapes (Doc – Members Only)
- 7-5 Assignment SE – Classifying Two Dimensional Shapes (Doc – Members Only)
Do You Want 5th Grade Math Activities Delivered To Your Inbox Everyday?
If you would like our 5th Grade Math, 6th Grade Math, 7th Grade Math, and 8th Grade Math Resources Emailed to you Daily then Click Here.

This Lesson is From Unit 7 – Geometry
Don’t Forget to Pin this Lesson on Teaching the Volume of a Right Rectangular Prism…
